Showing posts with label Star Wars. Show all posts

Sep 14, 2020

Let's Paint Star Wars: Armada

On the sixth week of summer the Norwegian fleet neared Whalsay.
- Tattúínárdǿla saga, Chapter 36: Concerning the Norwegian Fleet


I made my first ever Star Wars: Armada purchase in 2018, when we first played Star Wars: Rebellion. That game ended memorably when the Emperor himself led a single assault carrier to the just-relocated rebel base. In honor of the Imperial victory, I bought an assault carrier pack for Armada, which served as a TV table ornament. Because my co-commander is a big TIE Fighter player from back in the day, I also bought the Imperial Fighter Squadron II expansion on a whim, as it includes Maarek Stele.


**

Eventually, the pressure to buy the actual game became overwhelming - especially as it was dramatically cheaper at our friendly overseas gaming store, and I finished painting Star Wars: Rebellion. However, the lockdown scrapped our gaming plans - especially when our table was taken over by the Reformation. But I found painting the little starfighters surprisingly good fun, so for the moment, I guess I'm mostly just collecting the models.

I don't know why I got such a strong sense of deja vu spraypainting them, though!


I finished the X-wings first. It's very satisfying how much better they look with just a simple paint job compared to the unpainted models. I did the same here as I did with the Rebellion ones: Black details, Gunmetal Grey guns, Ivory hull, the squadron stripes and a Smoke wash over everything.


**

On the Imperial side, I started with the VT-49 Decimators and Lambda-class shuttles. I tried to keep things simple, so I started by painting the windows and whatnots black, and then giving them a base coat of Dark Seagreen and a Light Grey drybrush.


Again, very simple and very effective. The Rogues and Villains pack was somewhat more interesting because of the variety of the models, but I'm quite happy with how I did.


The Falcon, for instance, is just Ivory with black details and a Smoke wash, but I think it works excellently. I never really had any particular feelings about any of the rebel hardware from the movies - I still don't - but painting the Rebellion miniatures made me appreciate how important the worn and scuffed aesthetic is to the rebel side. I'm thinking about some Tau in rebel-like broken white for Warhammer. Incidentally, I'm really happy with Boba Fett's ship:


The YV-666 is in yellow because that's what it looked like on the squadron card? Anyway I don't know how much use we'll ever make of these things, but it's nice to have a tiny little Millenium Falcon, and they were fun to paint. Now if only we could get the Ebon Hawk!

**

During the quarantine, we found a good deal online for the Corellian Conflict expansion. I was interested in it for the campaign rules, but it also comes with squadron cards for Norra Wexley's Y-Wing Squadron and also Poe Dameron's mother. So the sensible thing to do was put in an order for the Rebel Fighter Squadrons pack. I painted the Rogue Squadron X-wings, Poe's mom's A-wings and the Y-wings.


I said earlier I don't have any particular feelings for any of the rebel hardware from the movies, and that's still true, but I'm discovering a real affinity for the Y-wing. It kind of reminds me of the one-man spaceships in Frontier: Elite II, which was a pretty big experience for me as a kid. I repeated what I did with the Rebellion models, so black and gunmetal for the nacelles, copper for the dorsal wiring and, of course, Ivory and Smoke. Norra Wexley flew for Gold Squadron, and I'm painting the other squadron green because I like green.


**

Oddly enough, during all this Armada squadrons have become my favorite thing to paint right now. I wasn't originally very interested in Rebel Fighter Squadrons II, but painting the Y-wings got me thinking about a Rebel fleet with lots of cheap fighters, and the Z-95 Headhunters would be perfect for that. But I mean I really got it for Ketsu Onyo. Look at her!


As an added bonus, there's a VCX-100 freighter, and even E-wings. Bizarrely, I got two extra E-wings! Not sure what to do with them. Looking at pictures of the VCX-100s and Lancers online, their base color seems to be grey, but I've taken the liberty of painting them with the same Ivory/Smoke scheme of the other rebel ships.


And here are the E-wings, Z-95s and Wedge Antilles' X-wings.


**

Finally, yes, I did also eventually get around to painting all the gazillion TIE Fighters that came with the core set, and the TIE Phantoms too. I did what I had done with the Rebellion TIEs as well and started with a Neutral Grey drybrush on the hull, but I did the edges and "spokes" on the wings in Light Grey this time.


And the TIE Defenders, including Maarek Stele's squadron. On the one hand, I could have done better with these; on the other, I never want to see a single Defender on my desk ever again.


Then I made it worse for myself by getting the Corellian Conflict expansion, because it meant I had the squadron card for Ciena Ree's TIE Interceptors, so I got the only squadron expansion I was missing: the Imperial Fighter Squadrons.


And here they are.


**

So yeah, apparently a thing that happened during the pandemic was that I ended up owning every squadron expansion to Star Wars: Armada. I still haven't painted everything, but I've thoroughly enjoyed myself. This has been a really good reminder that my first love in miniatures was 6mm Epic, and I still really enjoy painting the tiny stuff. Now, I still have piles of Warhammer things to finish, but I should really look into more smaller-scale miniatures.

Apr 20, 2020

Let's Paint Star Wars: Rebellion, part 2

Last time, I painted most of Star Wars: Rebellion; now it's time to (finally!) finish the job.

**

We scheduled a game with some new players, so the first thing I need to do is finish the models in the base game. Luckily there aren't that many of them left; we'll start with the Empire.

13. Star Destroyers

My Star Destroyers got the same treatment as the Interdictors: Dark Seagreen base coat, Light Grey drybrush.


I'm very happy with the end result!

14. Death Stars

For the complete Death Stars, I simply painted them Neutral Grey and drybrushed with Light Grey.


I painted the open parts of the Death Star under construction Black Grey, and drybrushed with Gunmetal Grey and Neutral Grey; the rest of the hull I painted the same as the completed ones.

**

15. Shield Generators and Ion Cannon

With the Imperial forces finished, it's time to get the rebel hardware done. I decided to do something a little different with the ground installations, and painted the base of the ion cannons Basalt Grey, and that of the shield generators Light Green.


16. Mon Calamari Cruisers and Rebel Transports

I've been very lazy with the rebel starships and just given them a base coat of Ivory and a Smoke wash. I kept the wash very light for the cruisers:


But hey, I think it works. I made the transports a bit more grimy:


17. CR90 Corvettes

Although the Rebellion models have been fairly high quality, as Fantasy Flight models usually are, the sterns of the CR90s looked pretty horrid.


But it was nothing a file and a pin vice couldn't fix!


Then it was a simple matter of Ivory, Smoke and the same squadron colors as I used on the smaller rebel spacecraft.


**

And that's it! Here are all the base game models, starting with the rebels:


And the Empire.


I'm absolutely delighted to have finished painting these models. After all, this was the project that relaunched my modeling hobby, and I feel like it's done wonders for my mental health. I'm also very happy that this is the first modeling and painting project I've finished after my sort-of-New Year's resolution to finish things.

**

Unfortunately, the four-player game of Rebellion we were planning to try never happened because of the coronavirus. Instead, I painted the Rise of the Empire expansion's models that I hadn't done yet.

18. Golan Arms Turret


I painted these to match the other rebel ground installations, i.e. Ivory, Smoke, Gunmetal Grey, with some Basalt Grey along the bottom.

19. Nebulon-B Frigate


For these models, I followed the Armada example: the grey parts are in Dark Seagreen with a Light Grey drybrush, and the lighter paneling is Ivory with a Smoke wash.

20. Shield Bunker


Finally, the shield bunkers I simply painted Dark Seagreen and drybrushed with Neutral Grey.

**

So there they all are: the project that got me back into this whole painting business is finally done. Of course, since we're still in coronavirus lockdown, who knows when I'll get to use any of these models for anything? Maybe when we've finished Here I Stand by email we'll do a remote game of Rebellion!

Sep 23, 2019

Warhammer 40,000: Zootopia's finest

This is a slightly strange story that starts with a wedding. We were invited to attend the wedding of two of our very dear friends last summer, and the dress code was "legendary", with a strong suggestion of cosplay or at least costume. We ended up going with a Star Wars theme; my partner wanted to go as Revan, and I'd always quite fancied an Imperial officer's uniform. I think we did a decent job of it; here's a picture.

I bought the uniform from an online store, who assured me that it was up to 501st Legion standards, and I believe it was! But when I searched their online store with the term "imperial officer", I got a whole bunch of Star Wars uniforms - and an Officer Hopps cosplay from Zootopia.


Now, we love Disney movies in this household, and Zootopia is an especially delightful one. Also, if you think about it, it makes perfect sense if Zootopia belongs to the Imperium. You'd think that population counter in Bunnyburrow would lead to big problems - unless they regularly ship a regiment of rabbits out to the Imperial Guard. I mean there must be stranger abhumans out there, you'd think.


Since I'd already used Eureka Miniatures rabbit samurai for my Stormbun Eternals, it wasn't much of a stretch to try bringing them over to Warhammer 40,000 as well. Here's a Chirikov Rad-Guards Scout Sentinel, being piloted by one of Zootopia's finest.


I am very happy with this model. The cockpit section is Dark Red, with the inside and some of the panels in Red; the legs are Red and Gunmetal Gray, washed with watered-down Black Glaze, which I think worked excellently.

**

Of course, I didn't stop there. To return to Star Wars for a moment, I've already used several models from Fantasy Flight's Star Wars: Imperial Assault in 40k, and I was wondering whether their AT-STs could be used as Sentinels. I bought a copy of the General Weiss Villain Pack to find out, because not only are AT-STs cool, but at a measly 20€ at our friendly local board game store, they're cheaper than Sentinels!


Also quite a bit bigger, it turns out. But if they're cheaper than Sentinels, then they're a lot cheaper than Armiger Helverins. The crew compartment is in Light Grey, with the metal bits on the guns in Gunmetal Grey. I wanted to make the legs a bit darker so I did what I did with Star Wars: Rebellion and painted them in Dark Seagreen. That came out a little bit too dark for my taste, so I painted some of the raised bits London Grey.

For the command Armiger, I found I had exactly one metal aquila left over from another project, so I stuck it on the front. I then sawed off General Weiss's head, replaced it with an Eureka rabbit's, and behold: General Hopps.


Delightfully, all three AT-STs I mean Armigers, pictured here mid-painting, fit perfectly into a Feldherr 90mm raster foam tray, with room to spare.


I really can't recommend Feldherr enough. Here's the finished squadron:


We've decided to run them as House Hawkshroud, although I'm thinking I'll name them the Loyal Zootopian Lancers.

**

I'll be honest: of all the conversions I've ever done, the Sentinel and General Hopps are right up there with Rebellion Captain Phasma as the models I'm most proud of. These are all fairly simple conversions, painted to, well, my ability; but I couldn't be happier with them.

May 13, 2019

Let's Play Star Wars: the Card Game

Back in 2017, we celebrated the fourth of May by getting a copy of Star Wars: the Card Game, but with everything that's been going on, it's taken me this long to get around to blogging about it. The game, of course, has been discontinued since, but I'm not letting that stop me.


Magali Villeneuve: Princess Leia

**


Way back when we first bought the Lord of the Rings LCG, we also immediately bought the Dead Marshes adventure pack, because my partner insisted on Boromir. This time, it was my turn, so we bought Jump to Lightspeed for Arden Lyn, the Sith antagonist of the unforgettable Masters of Teräs Käsi.

I'm not sure I can adequately explain to a native English speaker how surreal and fantastically hilarious Teräs Käsi is. Supposedly a Star Wars martial art, it was apparently named by someone taking an English-Finnish dictionary and looking up the words for steel and hand. Never mind that "steel hand" in Finnish would be a compound word and therefore spelled teräskäsi, and that would still sound kinda lame. More than that, though, the name "Masters of Teräs Käsi" is somehow so amazingly ludicrous that when I first saw it, I flatly refused to believe that such a game could possibly exist. Surely, I reasoned, this must be some bizarre joke. Reading an actual review of the game momentarily convinced me that it was real, but I promptly forgot it, no doubt because my brain dismissed it as completely absurd - meaning that I was stunned when I encountered it again after almost a decade. So once I learned that Arden Lyn was included in the Star Wars card game, how was I supposed to build a Dark Side deck without her?

One of the perennial hot-button issues of Finnish politics is whether and how much compulsory Swedish should be taught in our schools. Whatever the broader picture, for the purposes of this topic I'm delighted that we're a nation of bilingual illiterates, because it means that in addition to enjoying Teräs Käsi, we can also marvel at Hustru fönster, which is as ungrammatical and barely any less hysterical. I hope to one day see the card.

Finally, in the process of looking up those Wookiepedia links, I was reminded - I had mercifully forgotten this - that there is also a Teräs Käsi stance called "Förräderi". At this point, I feel quite comfortable in saying, on behalf of the Nordic countries, can you just fucking stop already.

**

Since it was the fourth of May, we had to try a game. I picked the Sith starter deck, and my partner used the Jedi deck.


Since it was our first game ever, we misplayed some things and had barely the slightest idea of what we were doing. We had a lot of fun, though! A particular highlight of our game was C-3PO's rampage through Coruscant. I had initially drawn the Heart of the Empire objective, and it looked like it might be a fun idea to try playing it.


Despite these extra resources, I ended up heavily outnumbered, so I used Varys There Is No Escape to wipe the board. Next turn, my partner played C3PO, and finding no units on my side, attacked Coruscant with him. Now, C3PO has no damage icons, but since there were no defenders, he did one unopposed damage to Coruscant. So imagine, if you like, C3PO wandering around Coruscant, somehow doing 10% of the damage the rebels needed to wrest it from the Empire - because I eventually lost by losing Coruscant.

**

While we were getting into the game last summer, Fantasy Flight announced the last adventure chapter Force pack cycle and its first instalment, Allies of Necessity. Since it featured Jyn Erso (a name straight out of the Knights of the Old Republic name generator) and my partner was a big fan of Rogue One, we had to get it. I was intrigued to notice there was also a dark side lady, a Doctor Aphra.


To find out who she was, I read her epynomous comic, and liked it enough to also get the Darth Vader comic it was a spinoff of. I highly recommend both! I find I very much enjoy Kieron Gillen's work: he writes an excellent Vader, and like the Dark Lord of the Sith himself, his stories move at a deliberate and purposeful pace, so far from the breathless rush that I find too many contemporary comics are consumed with.

Anyway, with both Jyn Erso and Doctor Aphra on board, we'll be getting into deckbuilding. That works very differently in Star Wars compared to the other Fantasy Flight LCGs: instead of selecting individual cards for your deck, you pick objectives, each of which comes with five preset player cards. This means there are less choices, but arguably they're far more significant ones: instead of agonizing over whether to have two or three copies of a single card in your deck, you're picking card sets and figuring how they're going to interact with each other. I think this was a good idea, and it wouldn't necessarily go amiss in other LCGs.

**

Finally, a verdict: this was a fun enough game and it seems a real shame if Fantasy Flight doesn't follow it up with another Star Wars LCG. A co-operative Star Wars card game made to anything even remotely like the Lord of the Rings LCG standard would frankly be amazing. We can always hope?

Oct 8, 2018

Let's Paint Star Wars: Rebellion

They had more than a hundred ships in their following when they sailed into the harbor of Aldiranborg, and the entire harbor was full of Norwegian warships as far as men could stretch their eyes.
- Tattúínárdǿla saga, Chapter 28: Concerning the Burning of Aldiranborg


I previously talked about how much we enjoyed Star Wars: Rebellion. One of its attractive features is the miniatures, which really contribute to the feel and theme of the game. Below are all the models from the base game and the Rise of the Empire expansion (as well as some Armada models, but ignore those), and, well, there are several.


I'm going to paint them! Or at least some of them.

Painting miniatures isn't just an aesthetic thing: it's a lot easier to tell different miniatures apart and spot them on the board or table if they're even rudimentarily painted. The Rebellion board is mostly black, like our TV table above; the white rebel miniatures stand out quite well, while the grey Imperial models tend to blend into the background and each other, forming a grey mass where it can be difficult to tell how many and what kind of miniatures there are. So if I'm going to paint something, I should start with the Imperials, and especially the smaller models.

Another angle is figuring out where you get the greatest return on investment. Most of the Imperial starships are grey, and you could paint them... well, grey. I think my last priority would be painting the Death Stars, as it just doesn't seem necessary. However, it's almost miraculous what you can do to a drab plastic model if you make it a nice base! So infantry models with bases tend to offer the best return on investment; I'm especially looking at the stormtroopers here. However, I also read a very clever blog post on how to paint TIE Fighters easily, and that also represents a considerable return on investment, since there are 24 of them!

So, based on this logic, I'm going to start by painting the stormtroopers and TIE Fighters. Because I've got the expansion unboxed as well, I'm also throwing in the TIE Strikers and assault tanks, because the same painting logic should work for the Strikers as for the Fighters, and I like tanks.


So here's what I did!

**

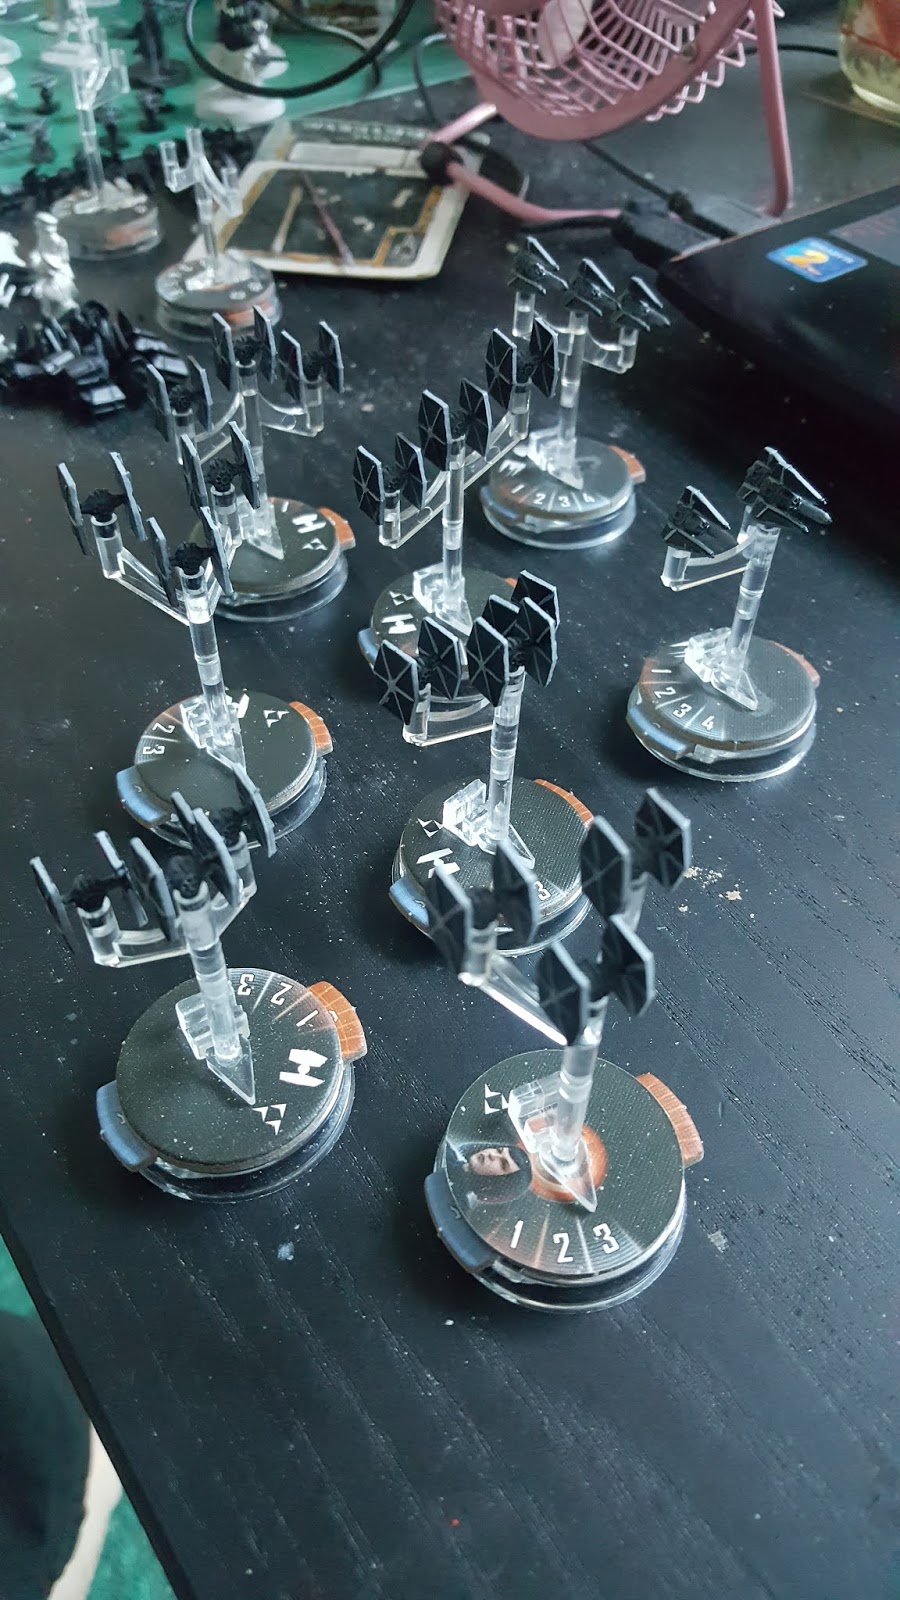
1. TIE Fighters and Strikers

I'm trying r2eq's method, which seems wonderfully simple - something you want when painting two dozen tiny models!

Phase 1: black primer


I used Army Painter matt black primer, and did the Death Star bases while I was at it. The primer was excellent; I highly recommend it.

Phase 2: drybrush the hull with Neutral Grey


Apart from the spray primers, I exclusively use Vallejo paints. A Neutral Grey drybrush paints the hull while leaving the cockpit windows and engine exhaust black, which is perfect.

Phase 3: paint the "spokes" and edges of the panels Neutral Grey


And that's it! Spray on varnish and it's done.

2. Stormtroopers

Phase 1: white primer


The Army Painter white primer is every bit as good as the black. Very satisfying finish.

Phase 2: bases


Like I said, bases are an easy way to make models look so much better! I knew from the outset that I didn't want to paint up 30 identical stormtroopers, so I went trawling through Wookiepedia for different paint schemes, and figured out appropriate bases for each. I did about half in Basalt Grey, which I think is a neutral enough color that can represent, say, rock or the deck of a starship. It's dark enough to be a good contrast for a light miniature, but not black enough to look like the poor guys are standing on empty space when you put them on the board. The sand-colored bases in the middle are German Camo Orange Ochre; the light green ones are, well, Light Green; and finally the dark green bases are German Camo Bright Green.

Phase 3: black details


You can do all sorts of complicated things with inks here if you want, but I just straight up painted the eye slots, guns and leg joints black. You can apply paint fairly liberally, as it can be painted over in the next phase.

For one group of stormtroopers, black details meant literally everything except two dots of Fluorescent Green per model: Krennic's Death Troopers.


Yes, they have black armor and black guns. Yes, it will be impossible to see them on the board. No, I was not in charge of wardrobe for Rogue One, so it isn't my fault. I liked the movie, so I wanted the Death Troopers to be represented among my models.

Phase 4: paint the armor your chosen color

For your basic stormtroopers, this simply means giving the white armor parts a coat of white paint, and you're done! If, like me, you suck at painting, this is a perfectly acceptable level of detail to shoot for.


Or choose a different color! I also painted up some crimson stormtroopers because apparently they canonically exist; I chose them to evoke the (in my mind nonsensically named) Emperor's royal guard. The color is Vallejo Scarlet.


Finally, going through stormtrooper subtypes on Wookiepedia taught me that such things as forest troopers exist; as a published forest history researcher, how could I resist? Instead of painting the armor white, I gave them a coat of Luftwaffe Camo Green.


Phase 5: apply armor markings

Like I said, I wanted variety in my stormtroopers and looked through Wookiepedia for some paint schemes. Below are two simple ones: the guys with red markings (plain Vallejo red) are Imperial shock troopers, and the ones with blue shoulder pads are stormtrooper snipers (Deep Sky Blue).


Phase 6: finish bases and varnish

When all the various paint schemes were done, I gave all the stormtroopers a coat of Gloss Varnish, and then set out to finish their bases. The basic stormtroopers, snipers and crimson stormtroopers got a simple Basalt Grey base, which I think kinda works for contrast.


The shock troopers' bases are German Camo Orange Ochre, with sand stuck on and painted Tan Yellow.


The forest troopers' bases were simply flocked.


For the Death Troopers, I wanted to evoke the scene at the beginning of Rogue One where they're fetching Galen Erso from Lah'mu, so I glued some larger flock to their bases, and I think it worked all right:


So here they all are!


I am just absolutely delighted with the way these turned out.

3. Tanks

I took the easy route with the tanks: I primed them white with the stormtroopers, and then painted two of them Neutral Grey. Two others got a coat of Luftwaffe Camo Green to match the forest troopers, and the last two were done in Tan Yellow to go with the shock troopers' sand bases.


I'm unsure whether to do more with them or not; in my opinion, a simple coat of paint makes them look like combat vehicles.

4. Captain Phasma

Apart from painting up different kinds of stormtroopers, I also knew I wanted to do something special. Now, I didn't particularly like the new trilogy, but it did have some excellent characters, and even though I'm sure it's a horrible anachronism, I wanted to include my favorite: Captain Phasma. I mean basically, she's a stormtrooper with a cloak. So I found some antique green stuff I had lying around, and made a cloak:


I rolled out an approximately cloak-sized chunk of green stuff and tried to make it look like it flows off her shoulders like her cloak does in the movies. She was then primed white with the other stormtroopers.


I gave her a Basalt Grey base and painted the edges of the cloak with Red.


The rest of the cloak, the armor joints and eyes were painted black.


Here's a view of the cloak from behind; I think it looks great!


Finally, the armor was painted in Natural Steel (whatever that is!), which I think turned out to be absolutely perfect. Here she is hanging out with the Death Troopers, because I was finishing them at the same time. The armor was varnished with Gloss Varnish, and the cape and gun with Matt Varnish.


I couldn't be happier with my Phasma! I've done my share of conversions on 28mm models, but never on anything this small, and I've rarely done anything with green stuff - never anything this substantial. So I'm absolutely delighted. I think this is the best model I've ever made: certainly it's the one I'm most proud of.

**

So that was the first batch of models!


They've made a significant dent in the sea of grey that is the Empire, but there's still lots of work to do!


I was working under a time constraint when I painted the first miniatures: everything had to be ready to be packed away by the time we left to spend Midsummer in the country. I think the stormtroopers and TIE Fighters looked great!


For the next batch, however, there's no rush at all, which means I could look into painting some rebel infantry. The rebel troopers are the biggest group of unpainted models left, and while I'm at it, I might as well paint the vanguards from the expansion too.

The next most common model remaining is the Y-wing, which I accept is a thing that exists in the Star Wars universe, but that's pretty much the extent of my feelings towards it. You can see why I started with the Imperials. Speaking of whom, there are also ten AT-STs.

Finally, in recognition of the glorious victory of Malastare in our first game ever, where the Emperor defeated the revolution using only a single assault carrier, I'll be painting the assault carriers as well.

Therefore, batch 2 consists of 21 rebel troopers, 6 rebel vanguards, 12 Y-wings, and 10 AT-STs and 8 assault carriers; everything's getting primed white.


5. Rebel scum troopers and vanguards

I was kind of struggling to come up with ideas to paint my rebel troopers, other than the basic Alderaanian consular security look. The Rogue One visual guide was a great help and inspiration here; I quite liked the ramshackle but very military look of the rebel troops in Rogue One, and it inspired me to put in a little effort with my troopers. I therefore painted up a bunch in their mixed greens, browns and blues. The blue is Dark Blue, the greens variously Luftwaffe Camo Green, Medium Olive and German Camo Bright Green, and the browns include German Camo Orange Ochre and Stone Grey.


Of course, I did some Alderaan guys as well. The shirts are Dark Pale Blue (surely an oxymoron?), the pants Neutral Grey and the helmets Ivory. I also painted two figures as rebel honor guards, with Luftwaffe Camo Green uniforms and Ivory helmets.


Another group was modeled on the Endor strike team from the movies; the green is USA Uniform drybrushed with Light Green, and the vests Neutral Grey.


To add a little color, I painted three figures as rebel pilots, with Orange flight suits and Ivory helmets and vests.


Finally, I wanted to do something a little special with my rebel troopers as well. One paint scheme for the troopers that suggested itself was the Hoth snow camouflage; but if I was going to do that, what do I do with the base? Plain white doesn't usually look great on a base, as it just tends to look unpainted. Then it occurred to me that a friend of mine has glitter paint! Or to be specific, pearlescent acrylic, but y'know, it glitters! So I had to try it.


And it worked! The mix of ink and Matt Medium doesn't glitter much, but it does give the bases a kind of, well, pearlescent hue that's easily the best snow effect I've ever managed to produce.


6. Y-wings

The Y-wings ended up becoming the testbeds for my rebel paint scheme ideas, and I think they turned out all right. First, I painted the engine bays and cockpit window black.


Then the hull was given a coat of Ivory, and the rods on the nacelles were painted Gunmetal Grey. I then did the squadron markings: three Y-wings each from Red, Blue, Green and Gold squadron.


I wasn't entirely happy with the Gunmetal Grey, as I think it ended up being too dark, so I gave those bits and the protrusions on the rear part of the hull a little highlight in Natural Steel, and painted the cables (?) coming off the nacelles with Copper. I also dabbed just a tiny amount of Natural Steel on the front of the nacelles. Finally, the whole model was given a wash of thinned-down Smoke to give it a slightly dirty, worn look.


I absolutely love the way these turned out! I wanted them to be a kind of slightly dirty off-white color to really contrast with the clean grey of the Imperial models, and the Ivory-Smoke combo worked brilliantly. I'll be painting all the rest of the rebel small craft with the same scheme.

7. AT-STs

These guys were easy to paint: I painted the legs with Dark Seagreen, and then did the top bit in Neutral Grey and gave the legs a light drybrush with the same. They were based to match the various stormtrooper bases, plus a pair in white and glitter.


8. Assault carriers

These are some of the easiest models I've ever painted. First, I gave them a coat of Dark Seagreen:


Followed by drybrushing with Neutral Grey.


I quite like the end result, so I'm sticking with it. I'm kinda tempted to just do the star destroyers the same way.

**

So here's batch two in its finished glory:


I actually got through these figures so fast that I still had time for another batch before our next trip to the country. Now that I have a paint scheme for the rebel fighters, I feel like I have to paint up the X-wings as well; after all, they blew up a Death Star for me! While I'm at it, I might as well do the airspeeders and U-wings as well, to finish all the rebel small craft.

On the Imperial side, the AT-ATs are the last unpainted Imperial ground units, and I'm going to try the assault carrier paint scheme on the Interdictors because we haven't got as far as using the expansion yet, so if it doesn't work out I'll have time to fix it. Finally, I think I discovered the perfect blues for a super star destroyer? Only one way to find out!

**

9. X-wings, U-wings and airspeeders

I used the same method as with my Y-wings, starting with painting the cockpit windows, guns and what have you in black.


I then did the metal bits in Gunmetal Grey, painted the hull Ivory and added squadron markings:


And finally, a wash of watered-down Smoke ink.


10. AT-ATs

These big boys got a base coat in Dark Seagreen, and I then painted the large surfaces on the hull with Neutral Grey. It's a bit dark grey perhaps, but I'm happy with it.


11. Interdictors

To test the assault carrier scheme, I painted the three Interdictors with Dark Seagreen, and then drybrushed with Neutral Grey. This, I think, turned out too dark.


Drybrushing with Light Grey, however, worked!


12. Super star destroyers

My super star destroyer paint scheme was very simple: basecoat in Dark Blue, followed by drybrushing with Dark Blue Pale. I think it's perfect.


**

So, with the Interdictors set aside for the moment, here's the finished third batch of miniatures.


The big picture is also starting to look a whole lot better.


At this point, I set off for the country again, and I can't go on without praising the Feldherr foam trays my friendly local game store sold me. Look at them!


Everything fits brilliantly and travels safely.


There's even spaces for all the cards, counters and dice.


These were fairly cheap where I got them, and I definitely recommend them, especially if you have to move your game around at all.

**

That's what I've managed so far! I'll be finishing the starships and ground installations over the winter, so hopefully by next year, I'll have a fully painted set of miniatures. These models have been lots of fun to paint; I have a feeling I'm going to need another painting project when this is done...