**
We rustled up the full six players this time. Here we are, again in a picture prudently taken before we started playing (one of us didn't want to appear in the photo).
Top Game of Thrones board game tip: take a picture of the board with your phone at the start of the planning phase. It makes it easier to negotiate with other players away from the table, and it's easier to reconstruct the game afterward!

Those of us who participated in the previous game all got a different house this time: our resident Joffrey Baratheon superfan picked House Baratheon, the winner of the previous game with Tyrell got Martell, and I ended up with House Lannister. Having spent the previous game cooped up in Ironman's Bay, I would now start on its southern shore, where at least I have a chance to get involved in the south - provided the Greyjoys let me!
Luckily, I reached a good accord with both Greyjoy and Tyrell. The Greyjoy-Lannister border was set between Riverrun and Seagard: the Greyjoys were interested in the north, while I believed the war would be won in the south. I also agreed to keep the Searoad Marches and the Blackwater neutral between myself and Tyrell, and arrived at an understanding with the Baratheons on our spheres of interest. I suppose it's possible to play this game without elaborate secret strategic negotiations á la Diplomacy, but why would you?
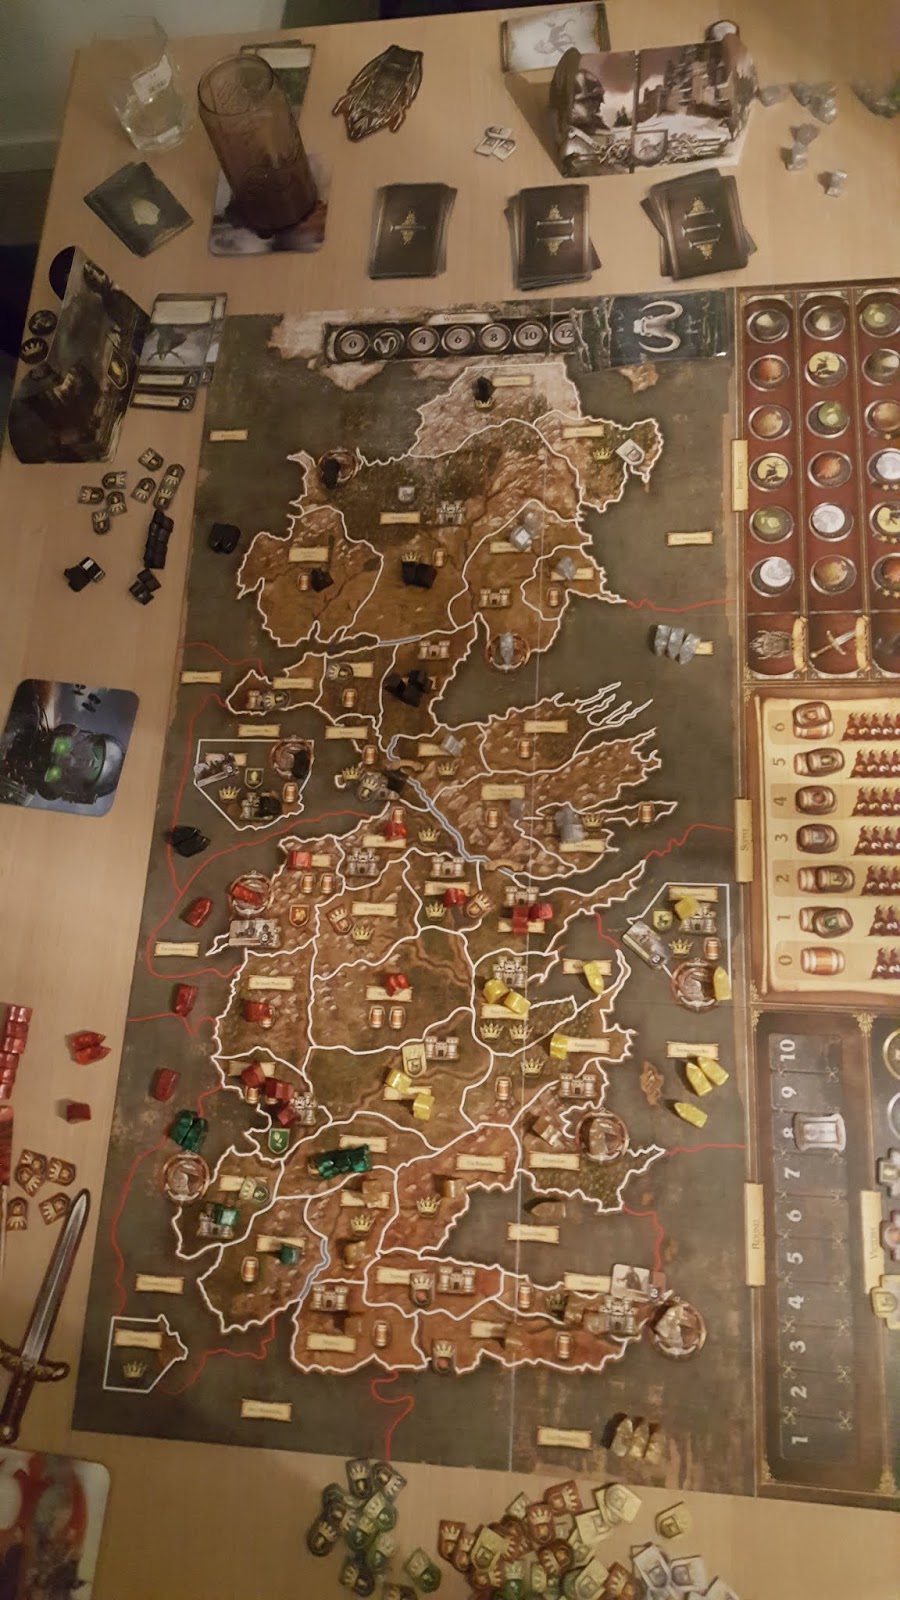
This was the situation at the start of turn 3. The Baratheons have taken King's Landing, and the Greyjoy army has landed at Seagard while their fleet covers Pyke. Tyrell, Martell and Stark are spread quite thin, and I feel I have to keep my forces somewhat concentrated in the face of the Greyjoy and Baratheon armies.

The third turn also saw our first player-versus-player combat as the Starks took the offensive and kicked the Greyjoys out of Moat Cailin. I advanced to Crackclaw Point, as per my accord with the Baratheons, for an attempt on the Eyrie. I can now admit that I was also looking for a good jumping-off point for an attack on the Baratheons; so far in both games, the Baratheons have found the lure of the Reach irresistible. Last time, they ended up overextending to the southwest and taking a beating, and I had a feeling something similar might happen this time as well. Meanwhile, things also kicked off in the south with battles in the Reach and at Starfall, where due to a combination of combat cards, both ended with the embattled areas deserted! For the moment, it looked like the Martells and Baratheons were co-ordinating an attack on House Tyrell. As the Greyjoy fleet sailed north into the Bay of Ice, my ships took up positions in the Sunset Sea.

Turn 4 saw the Martell fleet drive the Tyrell ships back into the Redwyne Straits as I happened to entirely coincidentally be blocking their retreat. Not only was decimating the Tyrell fleet in my interest, but it was also a great excuse to start extending my fleets southward, so I could get in on the fall of the Tyrells. At this point, two full-scale but almost entirely separate wars were going on: one for the Reach in the south and another for the North. One of the things I particularly like is that each turn, we draw a card from three Westeros decks, which set some global conditions for the game. For instance, if I remember correctly, one of the Westeros cards for turn 5 was Web of Lies, which prohibits playing Support orders. That really changed things, delaying most of our offensive plans by a turn. But soon enough, the wars were in full swing. By the time turn 7 rolled around, the Greyjoys had taken Winterfell, but were outflanked by a Stark landing at Moat Cailin. The Baratheons took the Tyrell capital at Highgarden, but were driven back by a counterattack; Tyrell and Martell chased each other around on sea and land. I sat tight.

Turn 7 was when I made my move. I had maintained a strong force at Riverrun, ready to pounce on Seagard, which I now planned to do. However, before I got around to it, there was great drama in the south: House Baratheon allied with House Tyrell in a surprise attack on House Martell. I should admit that in this case, I and the Martell player had one advantage: having played with the Baratheon player before, we were strongly expecting a dramatic but ultimately ineffective betrayal. It finally arrived on the seventh turn, and changed my plans quite a bit. The Tyrell offensive was so exuberant that it left Highgarden almost completely undefended. So, with ships deployed from the Golden Sound to the West Summer Sea, my army at Riverrun landed in Highgarden. I also moved in on the Reach, denying Baratheon the supplies they were getting from there. I was lucky enough that a Supply card came up in the next Westeros phase, forcing the Baratheon player to reconcile their armies.
On Turn 8, I decided I was going to win the game. I held five castles and strongholds: Lannisport, Riverrun, Harrenhal, Crackclaw Point and Highgarden. The Tyrells' participation in the great Baratheon plot had uncovered not only Highgarden but also Oldtown, with their army in the Dornish Marches. I barely held Highgarden against their counterattack, and having routed the Tyrell army, took Oldtown. Flint's Finger was theoretically there for the taking, but back in the planning phase I was concerned that it wouldn't stay that way, and I didn't have the troops to attack it if it was supported by the Greyjoy fleet. Instead, I went for the more cinematic option and had my army at Crackclaw Point mount a surprise assault on King's Landing. House Baratheon had indeed overextended themselves, and Gregor Clegane not only routed but destroyed the defenders of King's Landing and won me the game.

It's hard to imagine a more satisfying way to win the game, especially as House Lannister: watch everyone else beat each other up and then seize victory from under their noses. In reality, I was very lucky: I found myself between the Greyjoy-Stark death struggle for the North and the war in the south, free to intervene in either when the right time came. This wasn't without its risks, of course: I had to sit tight for several turns until I felt that Greyjoy was sufficiently committed to the north that they wouldn't stab me in the back, and there was always the danger that either war would be decisively won by someone, who would then almost certainly win the game.
Sea power was absolutely essential to my strategy. The small fleet in the Golden Sound was enough to screen my capital from the Greyjoys: in the time it took them to destroy it, I could at least try to reinforce it. I maintained an army of two knights and a siege engine at Riverrun for most of the game, mostly to deter the Greyjoys, but because of my chain of ships to the west, they could threaten Highgarden and Flint's Finger, even ultimately Starfall. Given how tight the supply limits can be, getting the most out of your armies is vital, and naval power is the way to do it.
**
I really do like this game a lot. It's a lot simpler in practice than it looks, and I think everyone's picked it up fairly quickly. It also lends itself well to Diplomacy-style negotiations and shenanigans, which I find a particularly enjoyable part of the game. I also mentioned the Westeros decks, which ensure that things like mustering troops, calculating supply limits and wildling attacks are impossible to predict. As a military historian, I want to say that the combat mechanics that mostly lead to armies chasing each other around and not necessarily getting a whole lot done are excellent.
What the above adds up to is a game where I feel like it's very difficult to know what will happen in advance, and where the players' decisions and interactions with each other are crucial. In other words, the players make the game, and I'm pretty sure they make it differently every time.
All in all, it was a ten-hour slog including a break for food, so I have to say that this is one of those games where you know you've played it. I'm very grateful to everyone who participated, and we'll do it again. Maybe another year or so from now!


No comments:
Post a Comment